
How to Build a DIY Atmospheric Water Collector: Can You Really Harvest Water from Air?
Blog post descLearn how to build a simple DIY atmospheric water collector, how it works, realistic water yields, and the science behind harvesting moisture from the air.ription.
INSPIRATION
Keeper of the vision
7/27/20265 min read
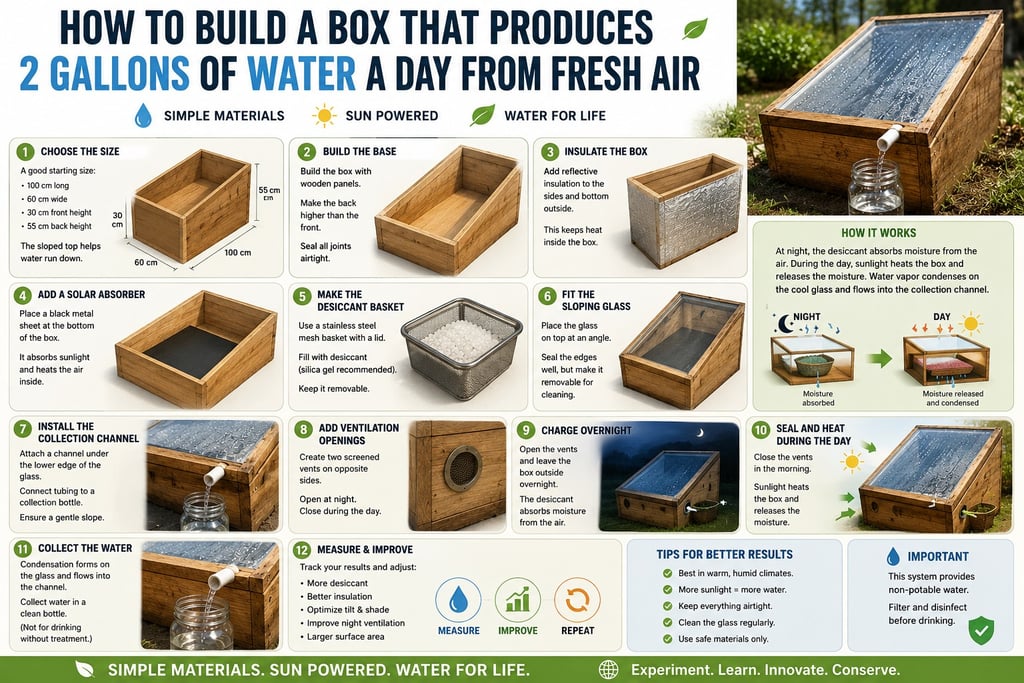
How to Build a Simple Solar Atmospheric-Water Collector
Can a Wooden Box Really Produce Water from Thin Air?
Water vapour exists all around us, even when the air feels dry. Atmospheric-water harvesting works by capturing that moisture and turning it into liquid water.
Commercial machines normally cool humid air below its dew point, while experimental passive systems may use desiccants—materials that absorb moisture overnight and release it when heated by sunlight. The US Department of Energy recognises condensation, desiccant capture and membrane separation as established approaches to atmospheric-water generation.
However, this simple project should be treated as an educational garden experiment, not as a guaranteed source of drinking water. Its output could range from a few droplets to a modest amount depending on local conditions.
What This Box Can Realistically Do
The collector described below uses a moisture-absorbing material overnight and solar heat during the day. Released vapour condenses against a cooler, sloping glass surface and runs into a collection channel.
Its performance will be best where:
nights are warm and humid;
days are sunny;
the glass remains cooler than the air inside;
the box has a large exposed surface;
the seals are airtight;
the desiccant is effective and safely contained.
Research prototypes using engineered sorbents can produce meaningful quantities, but these often use carefully designed materials, repeated operating cycles and optimised heat transfer—not simply scrap timber and glass.
Important Safety Warning
Do not assume the collected water is safe to drink.
Airborne dust, smoke, chemicals, insects, mould, construction materials and microorganisms may contaminate the water. Even professionally manufactured atmospheric-water generators require proper filtration, sanitation and maintenance; EPA research has noted the need to control microbial growth in such systems.
Use the first experimental batches for plants or demonstrations only. Drinking water should be tested and treated through an appropriate certified system.
Materials
You will need:
untreated exterior-grade timber or sealed food-safe panels;
one sheet of clean glass or clear polycarbonate;
stainless-steel screws;
weather-resistant, non-toxic sealant;
a shallow stainless-steel tray;
a removable food-safe mesh basket;
a moisture-absorbing desiccant;
food-grade silicone tubing;
a clean glass collection bottle;
black food-safe metal sheet or solar absorber plate;
reflective insulation;
a small spirit level;
saw, drill, screwdriver and measuring tape;
gloves and eye protection.
Avoid timber treated with preservatives, lead-painted materials, rusty metal, unknown plastics or adhesives that may release harmful chemicals when heated.
Choosing the Desiccant
A desiccant absorbs moisture from humid air. Experimental atmospheric-water systems may use silica gel, salts, hydrogels or specialised porous materials.
For a basic demonstration, reusable indicating silica gel is easier to handle than loose corrosive salts. Keep it inside a securely closed mesh container so that neither the desiccant nor dust from it can enter the collected water.
Do not use unknown industrial desiccants, fragranced moisture traps or chemicals taken from old packaging.
Step 1: Choose the Size
A useful experimental box might measure approximately:
100 cm long;
60 cm wide;
30 cm high at the front;
55 cm high at the back.
The sloping top helps condensed water run downward.
A larger surface area generally offers more opportunity for moisture capture, but size alone cannot guarantee a particular output.
Step 2: Build the Base
Cut a rectangular base panel and attach four timber sides.
Make the rear wall taller than the front wall so the glass roof will slope at roughly 20 to 30 degrees.
Seal all internal joints carefully. Warm, moist air must remain inside during the solar-release stage.
Allow the sealant to cure completely before placing any materials inside.
Step 3: Insulate the Box
Attach reflective insulation beneath the base and around the outside walls.
The aim is to keep solar heat inside the chamber while leaving the glazed roof exposed.
Do not cover the glass, because sunlight must enter through it.
Step 4: Add a Solar Absorber
Place a clean black metal sheet at the bottom of the box.
Dark surfaces absorb solar energy more effectively and will help heat the chamber and desiccant during the day.
Raise the desiccant basket slightly above the absorber so warm air can move around it.
Step 5: Make the Desiccant Basket
Build or purchase a shallow stainless-steel mesh basket with a secure lid.
Spread the desiccant in a thin layer rather than a deep pile. Greater exposed surface area allows it to interact with more air.
Make the basket removable so the material can be inspected, replaced or dried separately.
Step 6: Fit the Sloping Glass
Mount the glass over the box with its lower edge above the front wall.
Seal the upper and side edges, but design the frame so the glass can still be removed for cleaning.
Condensation should form on the underside of the glass and travel toward the lower edge.
Use toughened glass where possible and smooth or protect all exposed edges.
Step 7: Install the Collection Channel
Fix a narrow stainless-steel or food-safe channel beneath the lowest edge of the glass.
Give it a slight fall toward one corner.
Connect that corner to food-grade tubing leading into a covered glass bottle. The tubing should not touch the ground.
Seal the outlet against insects and dust.
Step 8: Add Ventilation Openings
Create two screened air openings in opposite walls.
Fit each opening with a closable flap.
At night, leave the flaps open so humid outdoor air can reach the desiccant. During the day, close them so sunlight heats the sealed chamber and releases the captured moisture.
Cover every opening with fine insect mesh.
Step 9: Charge the Collector Overnight
Place the dry desiccant basket inside the box shortly before sunset.
Open the vents and leave the system in a secure, sheltered location overnight.
The desiccant will absorb some of the water vapour passing through the chamber.
Higher overnight humidity will normally improve capture.
Step 10: Seal and Heat It During the Day
Shortly after sunrise:
Close both ventilation flaps.
Check that the glass and collection channel are clean.
Position the box in full sunlight.
Make sure the glass faces the best available sun.
Leave the unit undisturbed for several hours.
As the chamber warms, the desiccant should release moisture. Some of that vapour may condense on the inner glass surface and flow into the channel.
Step 11: Measure the Result
Use a marked measuring jug or kitchen scale to record the daily output.
One millilitre of water weighs approximately one gram, so weighing the sealed collection bottle before and after the test provides a simple estimate.
Record:
overnight relative humidity;
daytime temperature;
hours of direct sunlight;
amount and type of desiccant;
quantity of water collected;
visible leakage or condensation remaining inside.
Repeat the test for at least seven days before drawing conclusions.
Step 12: Improve the Design
Low output may be caused by:
air leaks;
insufficient desiccant;
low humidity;
poor solar exposure;
a glass surface that becomes too warm;
condensation missing the channel;
water remaining trapped in the desiccant;
inadequate airflow during the night.
Possible improvements include:
increasing collector area;
spreading the desiccant more thinly;
improving insulation;
shading the outer surface of the lower glass edge;
adding a second condensation plate;
using a safe solar-powered fan during moisture capture;
operating several smaller trays in rotation.
A Better Alternative for Most Gardens
For reliable non-potable garden water, rainwater harvesting is usually simpler and more productive. Roof gutters can direct rainfall into a covered water butt or storage tank, reducing demand on treated mains water. The Department of Energy identifies rooftop rainwater collection as a practical alternative-water source for uses such as landscaping.
Condensate from an existing air-conditioning or dehumidification system may also be collected where suitable, although it should not automatically be treated as drinking water.
Final Thoughts
Harvesting water from the atmosphere is real science, not fantasy—but the phrase “water from thin air” can make it sound easier than it is.
A homemade solar collector can be a valuable experiment that teaches us about humidity, condensation, renewable energy and water conservation. It may provide a little water for garden use under the right conditions. What it should not do is promise several litres of safe drinking water every day without proper engineering, treatment and testing.
Innovation begins with curiosity, but responsible innovation also requires honest expectations.
Connect
Join our journey toward wisdom and freedom
Subscribe
© 2026. All rights reserved.
The Seven Core Principles framework is intended for personal development and informational purposes and should not be considered legal, medical, financial, or psychological advice.
Use of this website is entirely at your own risk.
About Founder
Contact
Accessibility Statement